Here's a full write-up on the first year of my Home-Lab: https://piefed.social/post/1002037
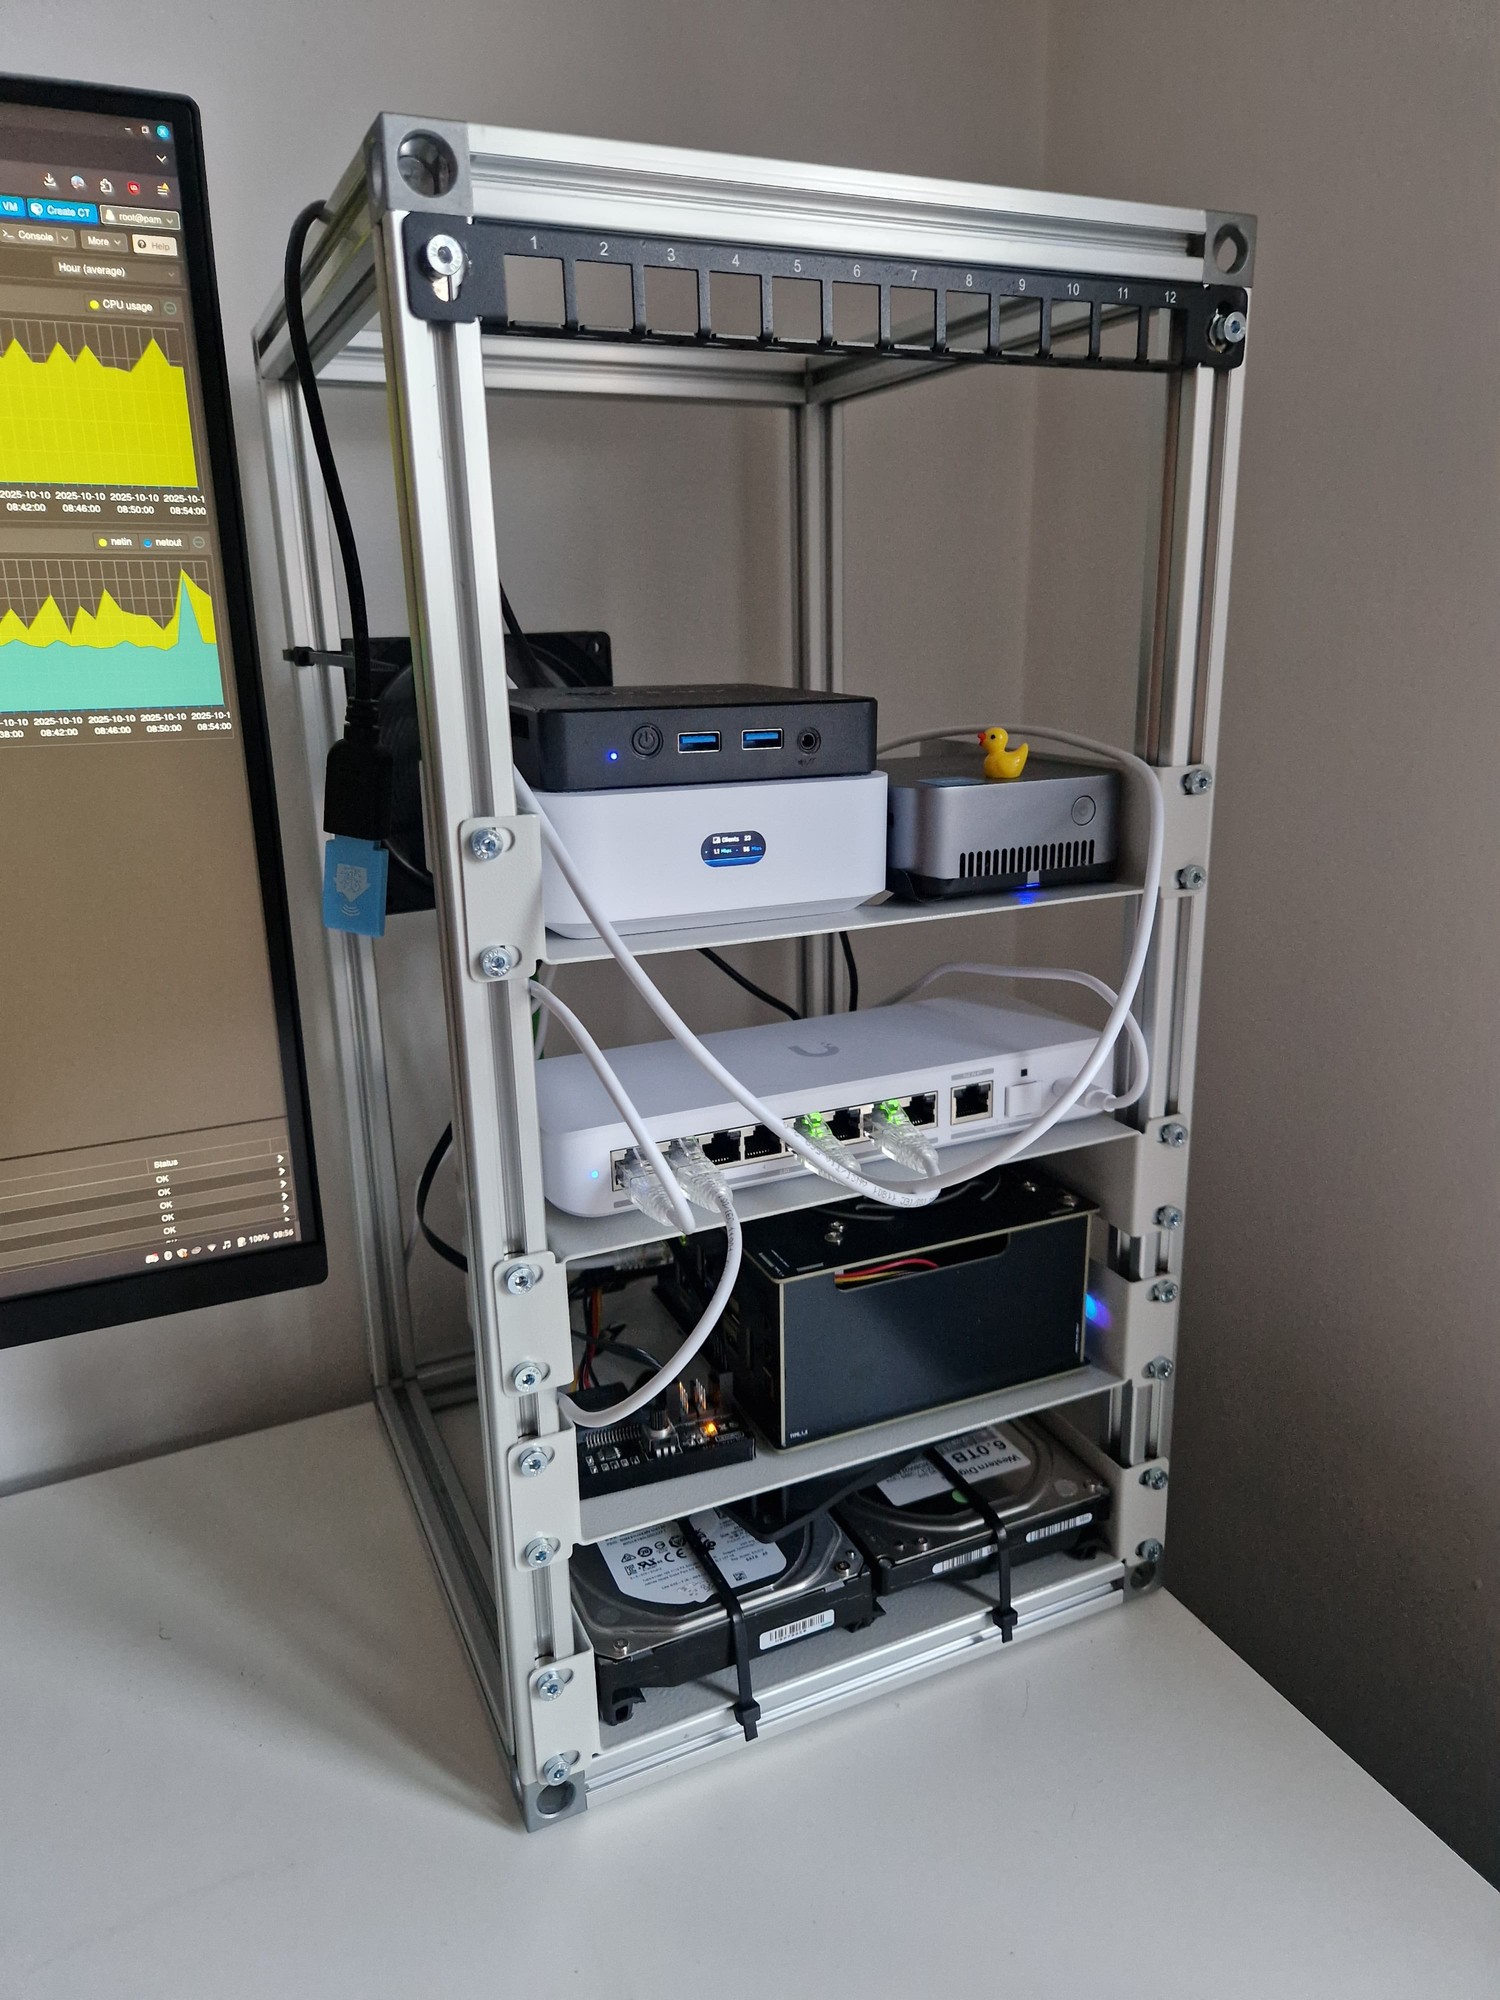
Since then I've now added networking and a self built 10" rack, I was undecided between MikroTik and UniFi but ended up going UniFI and I'm quite happy.
Building the 2020 Aluminum profile 10" server rack was a lot of fun and I learnt a lot of lessons along the way like:
- Cutting perfectly straight with a hacksaw is a bitch and nearly impossible (or at least for me) would not recommend.
- Buy a table/mitre saw or have them pre-cut
- Tapping threads yourself is a lot of fun, and I would recommend doing it yourself, worked perfectly every time.
- Bolt length and head size matters, even 1mm matters (that's what she said)
It's janky I know, but I love it and it's a lot less Janky than when everything was just on my desk
Next step for me would be to buy a 3D Printer (Sovol S6 Plus Ace) and print custom racks for everything
Shout out to https://www.motedis.com/ for the Aluminum parts, they can cut and tap all the parts to your desired length if you don't want to bother with that, but that's half the fun (and frustration)
46 Comments
DandomRude@lemmy.world · 56 pts · 322d
ACbHrhMJ@lemmy.world · 48 pts · 322d
Hey, nice rack.
beeng@discuss.tchncs.de · 36 pts · 322d
Thought it was so much bigger until I saw thoss HDDs 😀
Ek-Hou-Van-Braai@piefed.social · 24 pts · 322d
Here's some things for scale (AA Battery)
Valmond@lemmy.world · 14 pts · 322d
It's new 14" drives
blinfabian@feddit.nl · 11 pts · 322d
dude i thought that thing was the size of a closet😭😭
bigboismith@lemmy.world · 7 pts · 322d
Oh yeah, it's on a table, not the floor
uhmbah@lemmy.ca · 14 pts · 322d
I disagree, not jank.
I have the same duck.
Nice job OP. Thanks for posting. I'm going to do the same.
HelloRoot@lemy.lol · 14 pts · 322d
This is so fucking awesome! Congrats on the build!
if this is jankey, my 10" rack belongs in the landfill
Do you have any interesting plans to do something against the future dust buildup?
ace@lemmy.ananace.dev · 9 pts · 322d
I absolutely love that zip-tie mounting solution, it's the kind of thing I wish I saw in more homelab setups.
Ek-Hou-Van-Braai@piefed.social · 2 pts · 322d
Thanks I love the jank, one day it's going to be all neat and tidy and I'm going to miss the mess that it used to be, it adds character.
Mr_Dr_Oink@lemmy.world · 8 pts · 321d
Thats awesome. And really tidy, ive only just started making something like this and it already looks like this:
BananaOnionJuice@lemmy.dbzer0.com · 6 pts · 322d
Looks much more professional than mine, I just built my case from wood added room for enough disks and placed it into a kitchen cabinet.
And it's a nice touch fastening the disks with zip ties.
blimp@lemmy.world · 6 pts · 322d
Nice build. We use a lot of aluminium profiles at work for prototyping. We also have a mitre saw ;)
You can also have polycarbonate panels made for cheap to have a more finished appearance at the cost of ventilation and ease of access.
Ek-Hou-Van-Braai@piefed.social · 2 pts · 322d
Thanks yea that's the plan I'll add those to the side and something on top later on.
Either that or I'll 3D print a honeycomb mesh
ohshit604@sh.itjust.works · 6 pts · 322d
Was eyeing a 52Pi rack for a good little while this post inspired me to get one, but then I saw the shipping cost.
Ek-Hou-Van-Braai@piefed.social · 3 pts · 321d
Ooof that is rough!!
If you can make your own like I did I would highly recommend it.
If you have the Alu tubing cut and threaded for you most of the work is done
ohshit604@sh.itjust.works · 2 pts · 321d
Honestly I could, metal fabrication comes in handy, get it shop issued and laser or water cut send it through the machinists, I would have to supply the material myself which would be difficult but certainly doable.
I’ll have to consider this! By chance do you have drawings or dimensions of your rack as a starting point, looks like you’re using Aluminum HSS for the frame? Completely understandable if you rather not share the details,
Ek-Hou-Van-Braai@piefed.social · 2 pts · 321d
I'm more than happy to share. If others didn't share I wouldn't have been able to do my hobby.
So basically I just kinda copied this:
https://www.darkrym.com/posts/2025/05/my-rack-setup-2020-extrusion-diy-mini-rack/
The biggest difference is I used different corners, and I made mine a bit deeper (28cm total, so that it would fit a 30cm 3D printer bed)
HairyHarry@lemmy.world · 6 pts · 322d
How stable is this rack? Would that be a good frame for building a 3d printer table?
porksnort@slrpnk.net · 10 pts · 322d
Extruded aluminum of that type is insanely stable and easy enough to build for a reasonably handy person.
You only need a cheap cutoff saw and a drill, or you can order pre-cut and ore-drilled pieces to order.
There are a number of makers of extruded aluminum building systems, basically tinkertoys for adults. I have personal experience using 80/20 and the Tslots brands. They are functionally identical.
I have used it to build stands for heavy equipment like ultra-cold freezers for labs. It is more than sufficient for any server racking.
TheJesusaurus@sh.itjust.works · 6 pts · 322d
My old FDM printer frame and I think most are made of extruded aluminium exactly like this. Extremely sturdy and can be adjusted very finely with machine screws
Ek-Hou-Van-Braai@piefed.social · 5 pts · 322d
I'm pretty sure I can stand on it without issues, if I add some corner plates it would be even stronger.
But when in doubt you can always go for 3030 or 4040 which would be really strong, you can probably park a motorcycle on those
Monument@lemmy.sdf.org · 2 pts · 322d
I have an FDM printer (Ender 3 clone) that is mostly 2020 aluminum extrusion as the frame. A few years ago I found some 2020 on sale and built a set of shelves for my wife’s plants out of it. (Now - I know. It’s not the most economical use of materials, but it was the middle of winter, and I didn’t want to go work in the garage. Plus the 2020 was on sale.) It’ll support a slew of plants over a 4-foot span (~1.2m) without any sagging or other concerns. It can be wobbly side to side, but that’s a matter of bracing and connectors.
GreyEyedGhost@lemmy.ca · 3 pts · 322d
1.2m.
Monument@lemmy.sdf.org · 2 pts · 322d
I know. I was just seeing if you would notice. awkward laughter
(But thanks, I was trying to wing the conversion and started off with 3.3ft =1m and then did the numbers meme while my fingers typed gibberish.)
mrgoosmoos@lemmy.ca · 5 pts · 321d
oh buddy you gotta put the disclaimer of "in soft materials" on that, it's not much fun on steel even with buckets of lube
Snafucode@lemmy.world · 5 pts · 320d
Good work man, that's a nice setup. Loving the custom frame.
Sliversun@lemmy.world · 5 pts · 322d
Damn thats a clean setup 🔥
bulwark@lemmy.world · 4 pts · 322d
Congrats on the setup. Is that proxmox I see in the background?
Ek-Hou-Van-Braai@piefed.social · 2 pts · 322d
Jip everything is running in proxmox, except Home-Assistant I moved that to bare metal
yo_scottie_oh@lemmy.ml · 4 pts · 322d
That's pretty slick.
What are the HDDs plugged into? Would you mind posting some photos of the back?
Ek-Hou-Van-Braai@piefed.social · 4 pts · 321d
Right now the back is literally empty, I'm planning on moving all the power cords there soon.
The HDDs are plugged into the ODROID H4+ (the thing that looks like a PSU)
Check my linked post and you'll see what I'm talking about
UndergroundGoblin@lemmy.dbzer0.com · 4 pts · 322d
i like how your hdds just chilling there.
overload@sopuli.xyz · 3 pts · 322d
Not that jank, it looks great.
Railcar8095@lemmy.world · 3 pts · 322d
How/to what are the drives below connected to?
Ek-Hou-Van-Braai@piefed.social · 3 pts · 322d
They are connected to the ODROID H4+ mini PC above with SATA
Railcar8095@lemmy.world · 1 pts · 322d
How did you connect a 3.5 externally? Sata to mini PC and power from the PSU?
Ek-Hou-Van-Braai@piefed.social · 1 pts · 322d
The thing that looks like a PSU is actually a ODROID H4+ it has 4 SATA and power connectors, so I just power it from that.
It's all in excruciating detail here: https://www.hardkernel.com/shop/odroid-h4-plus/
You can also have a look at my old post: https://piefed.social/post/1002037 that might give you a better idea.
Thorry@feddit.org · 3 pts · 322d
A table saw is for lengthwise cuts, for cutting long things like these you need a cut-off saw.
Fun fact, you don't really need to tap soft aluminium like this. You can just drive the bolt straight in with an impact driver. I thought it was sketch at first, having always tapped them beforehand. But my buddy said it's a waste of time, just drive the bolts in right away. So I tried it and he was right, it works perfectly every time. They form perfect threads so you can easily remove and re-add the bolt just like when it was tapped beforehand.
bluGill@fedia.io · 4 pts · 322d
I have enough of a machinist background to doubt the threads are anywhere close to perfect. However if you are saying more than good enough I will agree.
Fuck_u_spez_@sh.itjust.works · 4 pts · 322d
I'd think they would at least need to be self-tapping sheet metal screws but that an impact driver could surely strip the holes just as fast as it threads them.
Fizz@lemmy.nz · 3 pts · 319d
Thats a beautiful rack
root@lemmy.world · 2 pts · 321d
Fully custom? Sick! Where do I get one? 😅
ohlaph@lemmy.world · 2 pts · 278d
It's perfect!!!
AlteredEgo@lemmy.ml · 2 pts · 321d
Nice! I want to build a rack too but want to fit a regular ATX board to fit older / cheaper hardware. So it has to be at least 304mm wide, probably 400mm